

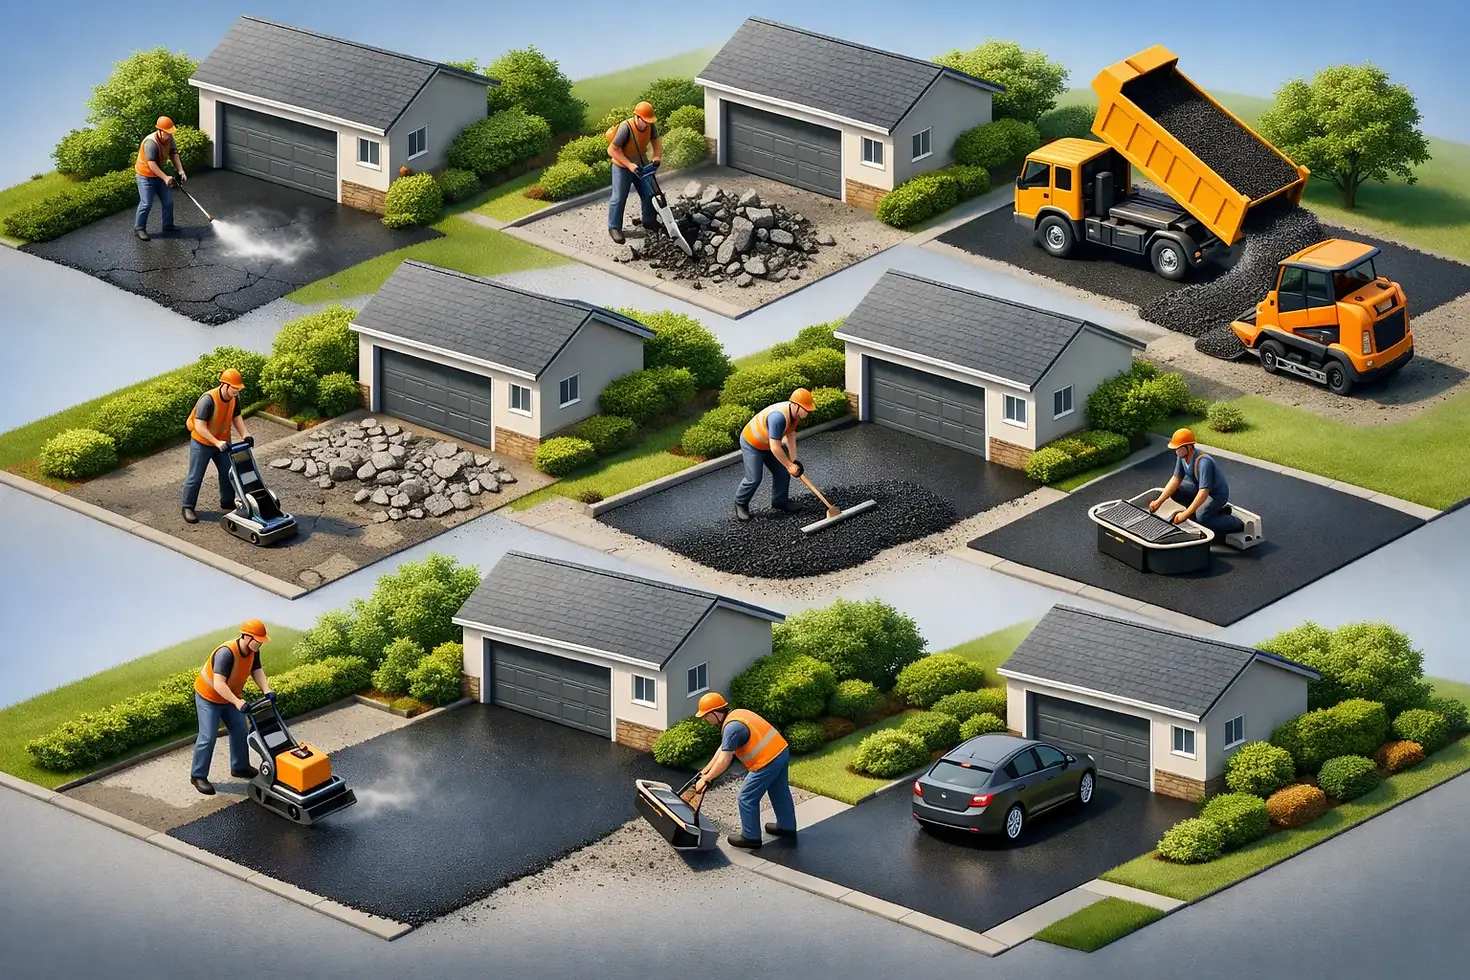
8 Steps for Driveway Resurfacing
- nettiedrown
- Jul 2
- 6 min read
A driveway usually tells you when it is past basic maintenance. The surface starts looking gray instead of black, small cracks spread into wider ones, and low spots begin holding water after every rain. If that sounds familiar, understanding the steps for driveway resurfacing can help you decide whether your pavement is a good candidate for a fresh new layer or whether deeper repair is the smarter move.
For many homes and small commercial properties, resurfacing is the middle ground between patchwork repairs and full replacement. It improves appearance, restores a smoother driving surface, and adds life to existing asphalt. But it only works when the base and underlying structure are still sound. That is why the process matters just as much as the finished look.
When resurfacing makes sense
Resurfacing is not a fix for every driveway. It is generally a good option when the asphalt has surface wear, minor cracking, weathering, and some shallow imperfections, but the driveway is still structurally stable. If the pavement has widespread sinking, major edge failure, drainage problems, or deep alligator cracking, covering it over may only hide bigger issues for a short time.
In coastal Maryland and Delaware communities, driveways also deal with salt air, heavy rain, freeze-thaw cycles, and summer heat. Those conditions wear down asphalt faster than many property owners expect. A driveway that looks rough on top may still have a usable foundation underneath, which is where resurfacing can be a practical investment.
Steps for driveway resurfacing: what happens first
The first step is a full site inspection. A contractor looks at the condition of the existing asphalt, the thickness of the pavement, drainage patterns, cracking, low areas, and how the driveway ties into garages, sidewalks, aprons, or parking areas. This part is not just about spotting damage. It is about figuring out whether the surface can support an overlay without creating future problems.
Grade matters here. If water is already draining toward the house or pooling in the same areas, resurfacing without correcting that slope can leave you with a smoother-looking driveway that still performs poorly. Height also matters. Adding a new asphalt layer changes the finished elevation, so transitions at garage doors, curb lines, and walkways need to be checked before any work begins.
Step 1: Evaluate the asphalt structure
A sound resurfacing job starts with honest evaluation. The contractor needs to determine whether the driveway base is stable enough to carry a new surface. If the existing asphalt is breaking apart because the sub-base has failed, resurfacing is usually not the right answer.
This is where experience matters. Surface cracks can look similar from a distance, but they do not all mean the same thing. Some indicate normal aging. Others point to movement below the pavement. A good assessment prevents spending money on a cosmetic fix where reconstruction is really needed.
Step 2: Clean and prepare the surface
Before repairs or new asphalt can go down, the driveway has to be cleaned thoroughly. Dirt, vegetation, loose gravel, oil spots, and broken pavement debris all interfere with bonding. If the surface is not properly prepared, the new layer will not adhere as well or wear as evenly.
Preparation may also include trimming edges and removing weak sections of asphalt. This part can look simple from the street, but it has a direct effect on how long the resurfacing lasts. A clean, stable surface gives the new material a better chance to perform.
Repair work before the overlay
One of the most overlooked steps for driveway resurfacing is pre-overlay repair. Resurfacing does not mean ignoring the problem areas underneath. Cracks, potholes, failed spots, and soft sections should be addressed before the new asphalt is installed.
Step 3: Repair cracks, potholes, and damaged sections
Minor cracks may be filled or treated, but larger damaged areas often need to be cut out and patched. If potholes or broken sections are simply covered, they tend to reflect back through the new surface over time. That process is often called reflective cracking, and it is one reason quick overlays fail early.
The right repair approach depends on the condition of the driveway. Some areas may need localized patching, while others may need more substantial correction. There is no one-size-fits-all formula. The goal is to create a stable surface before adding new asphalt, not just make the damage less visible.
Step 4: Address leveling and drainage issues
If a driveway has birdbaths, ruts, or uneven wear, a leveling course may be needed. This helps correct shallow depressions and improve water runoff before the finish layer is applied. It also helps create a cleaner final appearance.
Drainage should never be treated as an afterthought. Water is one of asphalt's biggest enemies. If water stays on the surface or gets into weak joints and cracks, deterioration speeds up. In some cases resurfacing alone is enough to improve drainage. In others, grading changes or more involved repairs are needed first.
Installing the new asphalt surface
Once the driveway is repaired and prepared, the actual resurfacing can begin. This is the part most property owners picture, but it only works well because of the earlier steps.
Step 5: Apply a tack coat if needed
A tack coat is a bonding layer placed between the existing surface and the new asphalt overlay. It helps the fresh asphalt adhere to the old pavement. Not every driveway situation is identical, but where a tack coat is appropriate, it plays an important role in making the resurfacing act like one integrated system rather than two separate layers.
Skipping this stage when conditions call for it can affect long-term performance. Bonding problems often show up later as slippage, separation, or premature wear.
Step 6: Lay the new asphalt overlay
The new asphalt layer is then spread over the prepared driveway at the proper thickness. Thickness matters more than many people realize. Too thin, and the surface may wear out faster or fail to smooth out minor imperfections. Too thick without the right transitions, and you can create issues at entry points, garage thresholds, or adjacent surfaces.
For residential driveways, the right thickness depends on traffic, the existing pavement condition, and the layout of the site. A driveway used by standard passenger vehicles has different demands than one that regularly sees delivery trucks, trailers, or service vehicles.
Step 7: Compact and finish the surface
After placement, the asphalt must be compacted correctly. Proper rolling helps create a tighter, more durable surface and gives the driveway its finished look. Good compaction is critical for longevity, especially in regions where weather shifts can stress pavement over time.
Edges and transitions also need attention. A resurfaced driveway should not just look smooth in the middle. It should meet surrounding surfaces cleanly and safely. That includes apron connections, sidewalk edges, and any tie-ins near garages or parking areas.
What to expect after resurfacing
Step 8: Allow proper curing time
Fresh asphalt needs time before it can handle regular use. The exact timeline depends on weather, thickness, and site conditions, but in general, you should follow your contractor's instructions closely during the first few days. Turning wheels sharply while parked, placing heavy equipment on the surface, or dragging objects across it too soon can leave marks or damage the finish.
Warm weather can extend the period when asphalt stays somewhat soft. That is especially relevant in summer months near the shore, where pavement temperatures can climb quickly. A little patience at the end of the project helps protect the investment.
Common trade-offs property owners should know
Resurfacing costs less than full replacement, and it is faster, but it is not a permanent substitute for rebuilding a failing driveway. If the base is in good condition, resurfacing can add years of service life. If the underlying structure is already compromised, replacement may be the better long-term value even if the upfront cost is higher.
There is also a difference between resurfacing and sealcoating. Sealcoating protects and refreshes the surface appearance of asphalt that is still in relatively good shape. Resurfacing involves placing new asphalt over existing pavement. Property owners sometimes use the terms interchangeably, but they solve different problems.
That is why a clear evaluation matters. A contractor should explain what your driveway actually needs, not just sell the larger job or the quicker one.
Choosing the right contractor for the job
Driveway resurfacing may sound straightforward, but the quality of the result depends on preparation, repair decisions, grading awareness, and installation technique. A local contractor who understands regional weather and soil conditions can spot issues that are easy to miss in a quick estimate.
For property owners across Delmarva, that local understanding is part of what makes the process smoother. O.C. Paving works with homeowners and businesses that want practical recommendations, clean workmanship, and a driveway surface that looks better because it was built on the right plan.
If your driveway is worn but not completely gone, resurfacing may be the right next step. The best place to start is with a careful inspection and an honest conversation about what the pavement can still support.


Comments